How to set up an abandoned cart automation
Last updated: June 11, 2025
Overview
Recover potentially lost sales with Sendlane's abandoned cart automation trigger!
Read on to learn about the triggers commonly associated with abandoned cart automations, and guidance on setting up your abandoned cart flow.
Before getting started
Integrate your eCommerce store with Sendlane
If you use BigCommerce, disable BigCommerce Abandoned Cart Saver if it is turned on
Your abandoned cart automation WILL NOT WORK unless Beacon general tracking is installed
Beacon identifies website visitors and tells Sendlane when your automation’s conditions have been met.
If Beacon general tracking is not installed on your store’s website, your abandoned cart automation will never trigger.
Learn more about Beacon general tracking in 📄 Understanding the Beacon tracking pixel
Background on triggers
Customers generally see much higher revenue from abandoned checkout automations than abandoned cart automations. We recommend setting up an abandoned checkout automation in addition to an abandoned cart automation.
Let’s investigate why, starting with the following table describing each trigger associated with “abandoned cart” automations:
Trigger name | Fires when |
Added to cart | A tracked contact adds a specified product to their cart |
Abandoned cart | A tracked contact adds a specified product to their cart AND does not checkout within a specified period of time |
Abandoned checkout | A contact reaches the first page of the checkout flow in your store AND does not make a purchase within a specified period of time |
The abandoned checkout trigger doesn’t fire until the contact starts the checkout process on your website (and the amount of time you select for “consider abandoned after” has passed), which means it has the context of your contact’s entire cart. This data is sent to Sendlane from Shopify and does not require the contact to be tracked via Beacon.
Abandoned product email blocks in automations using the abandoned checkout trigger will populate with information on all the products in a contact’s cart when they begin checkout, meaning contacts will be reminded of each item in their cart when they receive the email.
Unlike the abandoned checkout trigger, the added to cart and abandoned cart triggers do not capture or store data for the other products your contact may have added to their cart.
These two triggers use site tracking data from Beacon to tell Sendlane that an identified contact clicked "add to cart." This means that when you add an abandoned product block to an email, only the first product the contact added to their cart will appear in the email they receive.
Step One: Create an abandoned cart automation
Start your abandoned cart automation setup by creating an automation and selecting the Abandoned Cart trigger:
Click the Automations icon
Click New Automation
Click Start From Scratch
Enter a name for your abandoned cart automation
Click Start
Click Add Trigger
In the lefthand sidebar, click the Shopify or BigCommerce tab
Click Abandoned Cart
Step Two: Abandoned cart trigger settings
When you select the Abandoned Cart trigger, you’ll see its settings in the left-hand sidebar.
These settings are the criteria contacts need to meet to be sent through the automation.
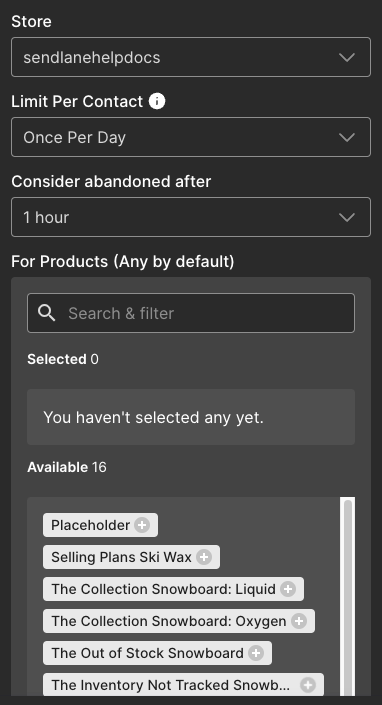
Store - Select the store you’re creating an abandoned cart automation for
Limit Per Contact - Not in the last, Once per day, or Do not trigger when already in automation are recommended for abandoned cart automations.
Consider abandoned after - Select a time period of at least one hour. The 5 minute and 30 minute settings are intended for internal testing and may inundate contacts with messages if used in a live automation.
You can specify individual products that should trigger the automation by searching for and selecting products in the For Products section of the trigger settings. If you do not select any specific products, all products will trigger the automation.
Shopify, BigCommerce, and custom store users can apply a product tag of sl-exclude to any product that should not trigger the automation. This process removes the product from Sendlane entirely. Read more about excluding products here.
Step Three: Prevent contacts from being sent through multiple pre-purchase automations
The first node of your abandoned cart automation should be an update automation node that ends your abandoned browse automation when contacts trigger the abandoned cart automation. Since adding items to the cart is further in the purchasing process than browsing, you don’t want contacts to receive both browse and cart abandon content.
To add an update automation node:
Click the + icon below the Abandoned Cart trigger
Click Update Automation
Click End Other
From the Automation dropdown, select your browse abandon automation
Select a time period wait before allowing contacts to re-enter the browse abandon automation once they've completed the abandoned cart automation
Click Done
Step Four: Filter out contacts who purchased after triggering the automation
Use end automation settings to pull contacts out of the abandoned checkout automation if they make a purchase.
End automation settings are accessed through the trigger and appear below the trigger's settings.
These settings will check for orders placed by the contact at any point after they've triggered the automation:
Condition - Select Shopify or BigCommerce
Store - Select the store you’re creating an abandoned cart automation for
Resource - Order
Order Status - Unfulfilled
Filter - Order Date
Operator - In the last
Relative date range - The total length of time of your automation, determined by wait nodes (for example, if your automation includes an email node, a three day wait node, and another email node, your automation is three days long)
Learn more about end automation settings in 📄 How to configure end automation settings.
Step Five: Abandoned cart automation content
Now that the logic for your abandoned cart automation is in place, you can add nodes for emails and SMS messages. For more information on optimizing your email and SMS nodes, check out our guide to automation nodes.
We highly recommend placing a wait node between messages to prevent contacts from receiving too many messages too quickly.
Emails must include an abandoned cart block
The Abandoned Cart email block displays the first product added to the cart and abandoned, with a link to the Contact's cart (Contacts will be taken to your website if they click this link on a different device than the device they created the abandoned checkout on). Only one abandoned cart block is allowed per email.
Step Six: Test and activate your automation
You can test your abandoned cart automation with an email address that is opted in to your account. To test your abandoned cart automation:
In your trigger's settings, set the "consider abandoned after" setting to 5 minutes
Activate your email nodes
Activate your automation
Log out of your Shopify store in all tabs
Visit your website
Add a product to your cart
Wait at least five minutes
Check your inbox to ensure you received the first email in your abandoned cart automation
If you successfully completed your automation, you're all set! If you didn't receive messages you expected to receive, or otherwise didn't experience your automation the way you want your contacts to, deactivate your automation while you troubleshoot.
Troubleshooting
Why are contacts showing as unsubscribed immediately after completing a purchase?
If your Shopify checkout page pre-selects the marketing email opt-in checkbox, contacts who uncheck the marketing email opt-in box during checkout will be unsubscribed from the List attached to your Shopify integration as soon as checkout is complete.
Why isn't the abandoned cart block available?
The abandoned cart block may not appear in your elements sidebar for two common reasons:
Your eCommerce integration is not set up correctly. Review your eCommerce store's integration with Sendlane for possible connection issues.
You already added an abandoned cart block to your email. Only one abandoned cart block is allowed per email.
Why aren't contacts flowing through the automation?
If you've double checked your automation setup against the instructions above, try re-syncing your eCommerce integration:
Click the Account icon
Click Integrations
Click your eCommerce integration
Click the Resync icon