How to add contacts to your audience
Last updated: September 5, 2025
Overview
Growing an engaged audience is the foundation of any successful marketing strategy! Read this guide for information on importing contacts and how sending is affected after imports.
Before Getting Started
Create at least one List for new contacts to be added to
Ensure that all contacts' opt-in details (date, IP Address, and source) are recorded
How to format a file of contacts for import
Size: Ensure your file is 250MB or smaller.
Headers: All columns must have descriptive headers with no special characters.
Required data: Email address, sign-up source, subscribed date, and sign-up IP are required for all rows. Proof of sending through another ESP is acceptable if you do not have the sign-up IP for all rows.
Email and SMS Consent: The Email and SMS Consent columns determine whether or not the contact has given you consent to receive marketing emails or SMS messages. The following values (case insensitive) will be accepted:
Subscribed/UnsubscribedTrue/FalseYes/No1/0On/Off
Phone Numbers:
Do not include a
+symbol without a valid country code in the phone number columnRows with an affirmative indicator for SMS consent must contain a valid phone number
How imports affect contacts' subscription status
Contacts' subscription status in your Sendlane account can change depending on whether the contact exists, the values used in the email and SMS consent columns, and whether the fields are mapped before import.
Read the sections below to learn how the email and SMS consent columns affect contacts' subscription status.
Email Consent
Review the following table to learn how mapping the Email Consent column will affect contacts with different statuses in your account during import:
New contact? | Subscription Status Before Import | Email Consent (EC) Column Value and Mapping | Contact's Subscription Status After Import |
Yes | N/A | Yes, with EC column mapped | Subscribed to Email |
Yes | N/A | Blank, No, or unsupported value with EC column mapped | Unsubscribed from Email |
Yes | N/A | EC column not mapped | Subscribed to Email |
Yes | Unsubscribed (from previous ESP) | No, with EC column mapped | Unsubscribed |
Yes | Unsubscribed (from previous ESP) | EC column NOT mapped | Subscribed to Email |
No | Subscribed to Email | Yes, with EC column mapped | Subscribed to Email |
No | Subscribed to Email | Blank, No, or unsupported value with EC column mapped | Unsubscribed from Email |
No | Subscribed to Email | EC column not mapped | Subscribed to Email |
No | Unsubscribed from Email | Yes, with EC column mapped | Subscribed to Email |
No | Unsubscribed from Email | Blank, No, or unsupported value with EC column mapped | Unsubscribed from Email |
No | Unsubscribed from Email | EC column not mapped | Unsubscribed from Email |
*If you do not map the Email Consent column, all NEW contacts will be imported with email consent = yes
If you are uploading a list of contacts new to your Sendlane account and the Email Consent column is not mapped, they will be imported with email consent automatically set to yes.
Doing this may mean you send to contacts who have not consented to receive your marketing emails and may result in increased spam complaints from these contacts.
SMS Consent
If the SMS consent column is mapped during import, the consent value in the import file will overwrite the consent value in the contact's profile.
How sending is affected for imported contacts
All imported contacts will be reviewed by our compliance team before they can be sent to and the first three to five campaigns sent to newly imported contacts will also be reviewed by Sendlane's compliance team.
The initial list review generally takes up to 24 business hours, though many reviews complete much faster. Review times can vary based on compliance team workload and the size of your audience and their engagement metrics (open and click rates). The initial list review generally takes 24 business hours. Sendlane's compliance team reviews imports from 9AM to 5 PM PST, Monday through Friday.
During list review, you may see the following statuses next to your Import:
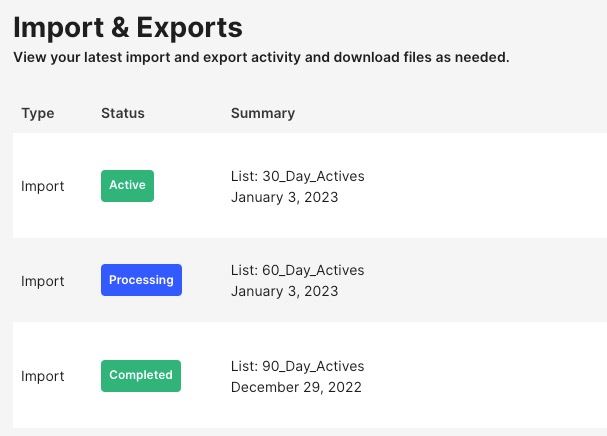 |
|
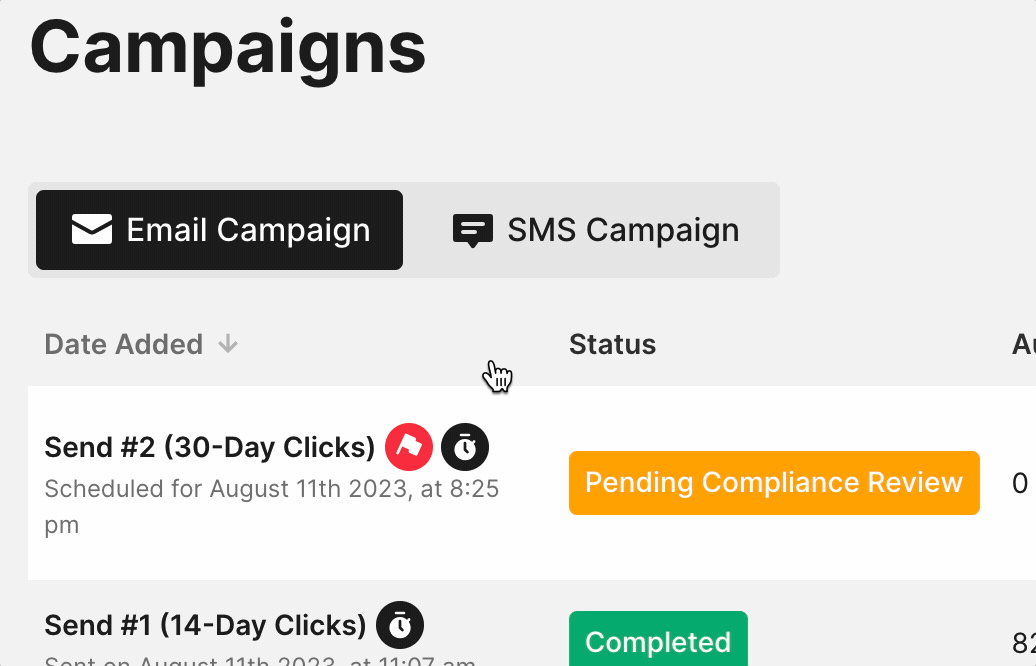
During list review, the first campaign sent to your newly imported contacts will be released gradually to a small segment of your audience to monitor their engagement before being sent to the full list.
During list review, the Sendlane compliance team will review three to five campaigns before they are sent to confirm the health of your list.
You'll see a red flag next to a campaign that is currently being reviewed, and you'll receive an email to the account holder's email address about the status of your campaign.
How to import contacts
You can import contacts in the list tab of the Audience page.
Import whole lists
To import whole lists:
Click the Audience icon
Click Lists
Click +List
Enter a name for your new list
Select or create a sender profile for your list
Click Confirm
Click Import
Drag your file into the file upload area, or click to select your file
See the Contact import tool section below for next steps
Contact import tool
Once your file loads, you'll see options to map your file's fields to standard or custom fields. Columns for standard fields (email, first name, last name, phone number, email consent*, and SMS consent) should map automatically. Email and SMS consent fields may not map automatically, ensure consent fields are mapped appropriately using the guidance above.
Opt-in details, like subscribed date, sign-up IP, and sign-up source, are usually automatically set to "Ignore this field," but our import tool may detect the column header. Select the correct field from the dropdown if it is not set automatically.
To add a tag to every contact in your file, enter the tag in the Tags field.
Check the permission checkbox to confirm that you have explicit permission to send marketing content to these contacts and click Next to head to the SMS import questionnaire!
If you do not plan to send SMS marketing content to the contacts you're uploading, answer No and click Finish to complete your upload!
If you do plan to send SMS marketing content to the contacts you're uploading, answer Yes and complete the questionnaire. Include as much detail as possible about your SMS marketing program, then click Finish to complete your upload!
Imported contacts will be reviewed by Sendlane's compliance team before they can be sent to
Congratulations on adding your first contacts to your account!
Check out our guide to List Review to learn more about what to expect next!
Manually create a contact
To manually add one contact at a time:
Click the Audience icon
Click Contacts
Click +Contact
Enter the contact's information
Click Create
Add new contacts with forms
Use a form to collect leads from your business' website! To learn more, check out our guide to getting started with forms.
Add new contacts with integrations
Sendlane offers hundreds of integration options with marketing tools you use every day. Head to the Integrations page for a full list of platforms we integrate with.
Add new contacts with the Sendlane API
Advanced users can use API calls to add individual contacts or lists of contacts.
Troubleshooting
After importing I received an email saying "Uh-oh... There's an issue with your import!"
Import issues could be related to:
File formatting: Review the file formatting note above and make sure your import file is formatted correctly. If you've included columns for non-required data, try removing those columns and attempting to upload again.
Plan issue: If you are on a free trial, you cannot import more than 100 contacts. If your import file contained more than 100 contacts, your import will not be accepted.
My list shows zero contacts after import, but I know contacts were uploaded
If your list displays a count of zero contacts after import but you uploaded a file with contacts, this typically indicates that the contacts were imported without proper email addresses or email consent mapping. The contacts may still exist in your account but won't display correctly in the list view.
To resolve this issue:
Ensure your CSV file includes a properly formatted email address column
Verify that the Email Consent column is included and mapped during import (see the Email Consent section above for proper formatting)
Re-upload your file with the correct email and email consent columns properly mapped
You can verify if contacts exist by creating a segment to check for contacts in the affected list.
File formatting: Review the file formatting note above and make sure your import file is formatted correctly. If you've included columns for non-required data, try removing those columns and attempting to upload again.
Plan issue: If you are on a free trial, you cannot import more than 100 contacts. If your import file contained more than 100 contacts, your import will not be accepted.