Understanding automation trigger filters
Last updated: April 1, 2025
Overview
When you set up a trigger filter, contacts must meet the trigger's criteria and the filter's criteria to trigger the automation. Trigger filters help you create highly targeted automations based on data from contacts' activity.
Read on to learn about adding more qualifying criteria to your automations with trigger filters.
What is a trigger filter?
Automations fire when a trigger's criteria is met, and trigger filters provide an optional additional layer of criteria you can use to further target your automation based on the data used to trigger the automation.
For example, automations using the order placed trigger fire when an order is placed, but maybe you want to create an order placed automation for a specific set of products. Without a filter on your trigger, all placed orders will trigger the automation.
Trigger filters use data from the action that triggers the automation to determine whether the additional criteria are met. In the order placed example, the trigger filter looks at the data from the action the user took (placing their order) to determine whether the specified products are or are not in the order.
Trigger filter examples
Below are examples of common uses for trigger filters.
This section does not list every possible use for trigger filters. Check out the trigger filter options, conditions, and data origins section below for a complete inventory of available filter options and get creative with your trigger filters!
Order placed automations for specific products, collections, or amounts
Use the product name or product collection option to include or exclude certain products or collections, then create an automation specific to the products or collections you've specified must be included or excluded to trigger the order placed filter. You can include information about how to use certain products, recommend similar products, or apply tags to contacts to note their interest in the products or collections you selected.
Low stock notifications
Use the product stock option with a minimum number of items to create a sense of urgency in contacts who have viewed or abandoned products with low stock levels. You can let contacts know that only a certain number of the products they interacted with are left in stock, and provide a call to action to help them complete their purchase.
Discount code tracking
Use the discount code option to create automations specifically for contacts who made a purchase with a specified code, or apply a tag to contacts who used a specified code.
Trigger filter options, conditions, and data origins
Trigger filters are available on triggers for Shopify, BigCommerce, and custom stores.
Review the table below for all available trigger filter options. Not all options are available for all triggers.
Option | Condition | Data origin |
Discount Code |
| Discount code used in an order or checkout |
| Email address associated with checkout or order | |
Financial Status |
| Financial status of order in store |
Landing Site |
| The first page of your store that the contact landed on. For example, a contact who types your store's web address (www.store.com) into their browser manually would have www.store.com set as their landing page. |
Note |
| Note on a contact's profile |
Order Tag |
| Store tags on an order (not Sendlane tags) |
Product |
| Products that were interacted with or purchased |
Product Collection |
| Product collections that were interacted with or purchased |
Product Tag |
| Store tags on a product (not Sendlane tags) |
Product Type |
| Product types that were interacted with or purchased |
Product Variant |
| Product variants that were interacted with or purchased |
Product Name |
| Name of product that was interacted with or purchased |
Product Price |
| Price of the product that was interacted with or purchased as set in the order or checkout |
Product Stock |
| Number of units in stock of the product that was interacted with or purchased |
Referring Site |
| If applicable, the site the contact visited before landing on your store's website (for example, if a contact searches for your store via Google, www.google.com would be the referring site) |
Source |
| Source (from store) of the checkout or order |
Subtotal Price |
| Subtotal price of the checkout or order |
Total Price |
| Total price of the checkout or order |
Billing Address (Country, State/Province, City, Zip) |
| Billing address in store |
Shipping Address (Country, State/Province, City, Zip) |
| Shipping address in store |
Custom integration event trigger filters
If you use a custom store as your eCommerce solution or to connect to an integration like Wonderment, you can create trigger filters using data from your integrations' custom event payloads.
Creating a trigger filter for a custom event involves finding the relevant data in your event's payload, selecting the appropriate operator for your data, and setting conditions that should be met based on that data.
See the example custom trigger filter section below for a start-to-finish example and the custom trigger filter types section for information on what types of data can be used in trigger filters.
Example custom trigger filter
In this section we'll describe each step using an example of an order placed event with a filter to only trigger on orders that are greater than ten dollars.
Step One: Access your event's payload
To determine what data is available to use in your filter you'll create an automation using an event in your custom integration as the trigger and access the trigger's data using the email builder preview:
Create an automation
Click Select Trigger
Click the custom tab
Click Custom Event
Select your store, a limit per contact, and the event
Click the + button to add a new node
Click Send Email
Click Create New Email
Enter a name and select a sender profile
Click Next to Content
Enter a subject line
Click Create Email
Click Start From Scratch
Click Visual Builder
Add a text block to your email
Replace the placeholder text with
{{ event_name | json_encode }}and replaceevent_namewith your event's actual nameClick preview
At this point you'll see your event's payload, unformatted, in the email preview window. Next, you'll format the data and determine what you want to use as your trigger filter.
Step Two: Find relevant data
Copy the payload from the email preview
Paste the payload into a JSON formatter like jsonformatter.org and follow the formatter's instructions for formatting your JSON
Review your data for a parameter you want to use as a trigger filter
For example, given the following payload we can create a trigger filter based on the order's subtotal using the subtotal_price property:
Step Three: Create a trigger filter
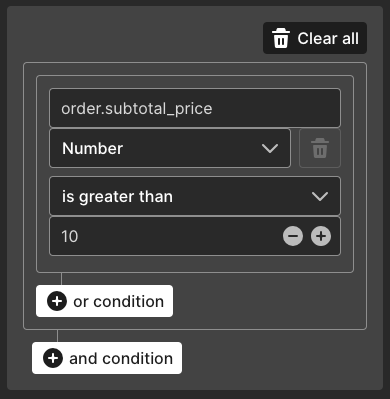
In the example above, the custom event's name is order and the property we want to create a filter from is subtotal_price. Filters on custom event data are constructed using dot notation; our trigger filter will use order.subtotal_price.
You'll need to use nested dot notation if your desired filter property is part of an array. For example, if subtotal_price was part of an array called pricing, we'd use dot notation to include the array like so: order.pricing.subtotal_price. A JSON beautifier can help visualize nested properties to ensure your dot notation refers to your data accurately.
To complete the custom event trigger filter:
Click your automation's trigger
Under Trigger Filters, click Edit
Enter your dot notation
Select your argument's type; number for our example (see below for more detail on types)
Select an operator; is greater than for our example (see below for more details on types)
Enter a value; 10 for our example
Add additional conditions as needed
Click Save
Custom trigger filter types
Trigger filters can be created using the following data types:
Boolean - A true or false statement like whether a customer is a member of your VIP program
Date - A date like date of subscription, upcoming renewal, or birthday
List - An item in an array like whether a particular product is in an order or a maximum/minimum number of products in an order
Number - A number like subtotal or total of order
Text - Any text field like email address, name, or physical address properties