Personalization and Templating Syntax
Personalization Tags are codes that pull information stored in Contact profiles into email and SMS messages, allowing you to personalize your content to each individual Contact.
🚦 Before Getting Started
If you plan to use Custom Fields to personalize email or SMS content, create them in Sendlane and collect data from Contacts
- Insert Personalization in Email Subject Lines
- Insert Personalization in Email Content
- Insert Personalization in SMS Messages
- Create a Default Value for Personalization
- Standard Personalization
- Advanced Templating Triggers and Filters
- VAR Personalization Tags
Insert Personalization in Email Subject Lines
- Click into the subject line where you want the personalization to appear
- Click the tag icon
- Select a personalization tag
Insert Personalization in Email Content
- Click into the email wherever you want personalization to appear
- Click the three dot menu
- Click the personalization icon
- Click the Select Personalization dropdown
- Select a personalization
If Contacts have data for the selected Custom Field, they'll see their data where the personalization tag was inserted.
Insert Personalization in SMS Messages
- Click into the SMS message where you want personalization to appear
- Click the personalization icon
- Select a personalization
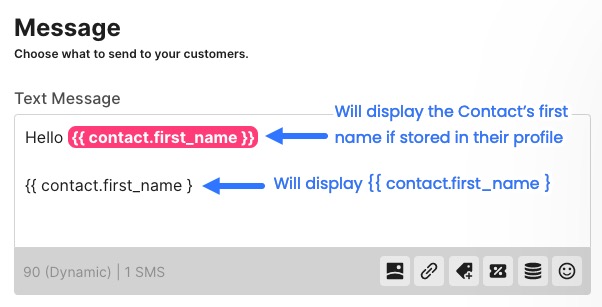
🚨 Personalization in SMS must be highlighted pink
Personalization selected from the personalization icon will be highlighted in pink when you insert it into your SMS.
Highlighted pink personalization will pull data from Contact profiles and display it in the message Contacts receive. If personalization is not highlighted pink, it will not pull Contact data and will display as a broken personalization tag in the message Contacts receive.
Create a Default Value for Personalization
If Contacts do not have data for the selected personalization tag, they will see a blank space where it was inserted if a default value is not specified.
To create a default value for a personalization tag:
- Click the Audience icon
- Click the Personalization tab
- Click the Custom Field's tag to copy it
- Paste the Custom Field where you want it to appear in your email or SMS
- Add
| default('')
before the closing curly brackets - Enter the default value between the quotation marks
In the first name example used above, the final personalization tag would look like {{ contact.first_name | default('Friend') }}
Standard Personalization
Tag Name | Tag | Display Example | Notes |
First Name | {{ contact.first_name }} |
John | |
Last Name | {{ contact.last_name}} |
Doe | |
Full Name | {{ contact.full_name }} |
John Doe | |
{{ contact.email }} |
johndoe@sendlane.com | ||
Phone | {{ contact.phone }} |
+1123467895 |
|
Custom Field | {{ contact.custom('FIELD_ID') }} or {{ contact.custom('FIELD_NAME') }} |
Custom data | Replace FIELD_ID with the custom field's ID or replace FIELD_NAME with the custom field's name |
|
Advanced Templating Triggers and Filters
The following advanced templating syntax requires some knowledge of Twig and a willingness to experiment. Use the following resources to learn more about Twig:
The following syntax will display all available options for either order or checkout data:
Syntax | Shopify Automation Triggers | BigCommerce Automation Triggers |
{{ trigger.order | json_encode }} |
|
|
{{ trigger.checkout | json_encode }} |
|
|
To see all available options:
- Create an Automation with at least one of the qualifying triggers noted in the table above
- Add an email node to the Automation
- Add a text block to the email
- Paste the order or checkout syntax in the text box
- Click Preview
- Review available options
- Remove the syntax from the text block
Shopify or BigCommerce Data Syntax
The following syntax can be used in email nodes of Automations using the trigger noted in the Automation Trigger column.
Syntax | Notes | Shopify Automation Triggers |
BigCommerce Automation Triggers |
{{ trigger.order.value }} |
Replace value with any available items shown by the json_encode function |
|
|
{{ trigger.product.value }} |
Replace value with any available items shown by the json_encode function |
|
|
{{ trigger.productvariant.value }} |
Replace value with any available items shown by the json_encode function |
|
|
|
Shows a product's:
|
|
|
|
Filters
Personalization tags can be modified by the filters below. In templating syntax filters are separated from personalization tags by a pipe symbol ( |
). Multiple filters can be used on the same personalization tag. When multiple filters are present, they cascade from left to right.
Function | Tag | Display Example | Notes |
Capitalize | {{'text'|capitalize}} {{contact.first_name|capitalize}} |
Text Jimmy |
Will capitalize the first letter in a string |
Date | {{"now"|date("m/d/y")}} |
01/01/2023 | Inserts the date the message was sent in the specified format. Month, day, and year can be rearranged or removed. - can be used instead of / |
Date Modify | {{"now"|date_modify("+1 day")|date("m/d/Y")}} |
01/01/2023 | The date_modify function allows you to add or subtract a specified number of days, months, or years to a date. |
First | first in a tag like {{trigger.getOrder().name|first}} |
Displays the first item in the specified list or array | |
Last |
last in a tag like {{trigger.getOrder().name|first}} |
Displays the last item in the specified list or array | |
Lower | lower in a tag like {{contact.first_name|lower}} |
jimmy | Returns a string in all lowercase |
Upper | upper in a tag like {{contact.first_name|upper}} |
JIMMY | Returns a string in all uppercase |
Title Case | title in a tag like {{'here is some text'|title}} |
Here Is Some Text | Returns a string in title case |
Number Format | {{ |number_format(0, '.', ',') }} |
Set the number of decimal places (0), decimal point(s) '.', and thousands separators ',' in any number | |
Random | {{ random(['value1','value2','value3']) }} |
value2 | Returns a random value from the list |
Raw | raw in a tag like {{product.name|raw}} |
Returns the raw information for the specified value rather than adjusting special characters | |
VAR Personalization Tags
Tag Name | Tag Code | Display Example |
Site name | VAR_SITE_NAME |
Sendlane |
Site URL | VAR_SITE_URL |
https://www.sendlane.com |
Unsubscribe | VAR_SITE_UNSUBSCRIBE |
To update or remove your contact information please Manage Your Subscription |
Contact first name | VAR_FIRST_NAME |
John |
Contact last name | VAR_LAST_NAME |
Doe |
Contact full name | VAR_FULL_NAME |
John Doe |
Contact email | VAR_EMAIL |
john@sendlane.com |
Contact phone number | VAR_SUBSCRIBER_PHONE |
888-927-2664 |
Contact mailing address | VAR_MAILING_ADDRESS |
Sendlane, 10620 Treena Street Suite 250, San Diego, CA, US 92131 |
Contact country | VAR_COUNTRY |
United States |
Contact state | VAR_STATE |
California |
Contact city | VAR_CITY |
San Diego |
Contact opt-in date | VAR_SUBSCRIBE_DATE |
2020-05-01 |
Contact IP address | VAR_SIGNUP_IP |
172.16.174.1 |
Formatted date | VAR_FORMATTED_DATE |
May 1, 2020 |
Date | VAR_DATE |
2020-05-01 |
Time | VAR_TIME |
16:32:41 |
Year | VAR_YEAR |
2020 |
Month | VAR_MONTH |
May |
Day | VAR_DAY |
Tuesday |
Time sent | VAR_TIME_SENT |
18:39:29 |
Date & time | VAR_DATE_TIME |
2020-05-01 16:32:41 |
Day, date & time | VAR_DAY_DATE_TIME |
Fri, May 1, 2020 4:32 PM |
Day, date & time | VAR_DAY_DATE_TIME |
Fri, May 1, 2020 4:32 PM |
Campaign ID | VAR_CAMPAIGN_ID |
1 |
Automation ID | VAR_AUTOMATION_ID |
2 |
Troubleshooting
My Contact's Personalization Tag isn't populating with their data!
You may not see populated personalization tags for two common reasons:
- The Contact's Profile doesn't have data in the specified field. Contact Profiles without data in Personalization Tag fields will see a blank space where that Personalization Tag is inserted in any email they receive unless you set a default value.
- There is a typo in the personalization tag. Copy and paste personalization tags from the personalization tab of the audience page or this help doc to avoid typos.