How to set up a post purchase automation
Last updated: June 11, 2025
Overview
Post purchase automations are a great way thank customers for their order, introduce them to your brand, recommend products, offer a discount, ask for a review, and more. Read on to learn how to set up the perfect post purchase automation.
Read on for important background information on triggers for post purchase automations and how to set one up step-by-step.
Background on triggers
You should use the Order Placed trigger for your post purchase automation unless your store’s unique setup requires a different trigger.
Other triggers commonly attempted for post purchase automations, such as product purchased and checkout complete, do not provide as much utility as the order placed trigger.
The product purchase trigger is unsuitable for most post purchase flows because it fires on the product level instead of the order level; an order with more than one product will trigger the automation once for each product, with no way to reference all products in the order in an email. The order placed trigger fires when an order is placed and retains information about all products in the order.
The checkout completed trigger fires on the order level, but as soon as a checkout is complete, information about the products that were in the cart during checkout is moved out of the checkout table of Sendlane’s database and into the order table of the database. This means that the checkout completed trigger doesn’t retain information about the contents of the checkout.
Step One: Create a post purchase automation
Start your post-purchase automation setup by creating an automation and selecting the Order Placed trigger:
Click the Automations icon
Click New Automation
Click Start From Scratch
Enter a name for your post-purchase automation
Click Start
Click Add Trigger
In the lefthand sidebar, click your eCommerce integration’s tab
Click Order Placed
Step Two: Order placed trigger settings
When you select the Order Placed trigger, you’ll see its settings in the left-hand sidebar. These settings are the criteria contacts need to meet to be sent through the automation.
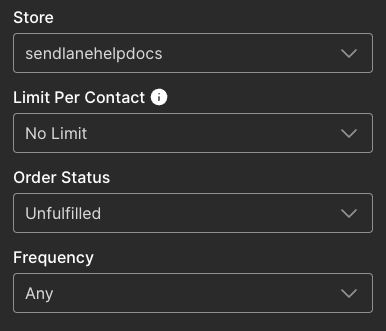
Store - Select the store you’re creating an order placed automation for
Limit Per Contact - No Limit is recommended for post purchase automations.
Order Status - We suggest
unfulfilledso that the automation is triggered right after the purchase. Selecting any means the automation will be triggered any time the order's status is updated, including from unfulfilled to fulfilled.Frequency - Select Any if you want contacts to be sent through the automation every time they purchase. Select the corresponding option if you want contacts to be sent through the automation only on their first, second, or third purchase.
If you have a long post-purchase automation, you might want to configure end automation settings to pull contacts out of the automation if they make a purchase before completing the automation.
Step Three: Prevent contacts from continuing through pre-purchase automations
A customer's pre-purchase journey usually looks something like this:
Browse an item
Add items to cart and/or start checkout
Purchase items
Because placing an order is the last step in the pre-purchase journey, you don’t want contacts to keep receiving pre-purchase content about orders they’ve already completed.
The first node of your post-purchase automation should be an update automation node that ends your abandoned browse, abandoned cart, and abandoned checkout automations.
To add an update automation node:
Click the + icon below the Order Placed trigger
Click Update Automation
Click End Other
From the Automation dropdown, select your browse abandon automation
Select a time period wait before allowing contacts to re-enter the browse abandon automation once they've completed the abandoned browse automation
Click Done
Repeat steps 1-6 and select your abandoned cart automation for step 4
Repeat steps 1-6 and select your abandoned checkout automation for step 4
Step Four: Post purchase automation content
For more information on optimizing your email and SMS nodes, check out our guide to automation nodes.
We highly recommend placing a wait node between messages to prevent contacts from receiving too many messages too quickly.
Optional: Add a conditional split to create nodes for specific products
Conditional splits allow you to target specific products for specialized content.
If you'd like to create specific content for specific products or product groups, create a conditional split node under your final End Automation action and set the conditions for:
Condition: From this trigger
Resource: Order
Filter: Product or Product Collection, depending on what you want to target
Select Items or Groups
Click Done
Create nodes under each path:
Yes Path | No Path |
Customers who had the selected products or product groups in their order | Customers who DID NOT have the selected products or product groups in their order |
Step Five: Test and activate your automation
You can test your post-purchase automation by placing a test order in your store with an email address that is opted in to your account.
To test your post-purchase automation:
Activate your email nodes
Activate your automation
Place a test order
Check your inbox to ensure you received the first email in your post-purchase automation
If you received the email, your automation was set up correctly and should stay activated
If you successfully completed your automation, you're all set! If you didn't receive messages you expected to receive, or otherwise didn't experience your automation the way you want your contacts to, deactivate your automation while you troubleshoot.
Troubleshooting
Why are contacts not going through the automation?
If you've double checked your automation setup against the instructions above, try re-syncing your eCommerce integration:
Click the Account icon
Click Integrations
Click your eCommerce integration
Click the Resync icon