How to use conditional splits in automations
Last updated: June 5, 2025
Overview
You can create logic based paths in automations with conditional splits to send contacts on targeted journeys.
Read on to learn more about conditional split logic and how to add them to your automations.
Understanding conditional splits
Conditional splits are automation nodes that function like segments. You can use a conditional split to create logic based conditions that determine which of two automation paths contacts should experience.
Conditional splits create divergent paths in automations based on conditions like "has a specified product in their order" or "has a tag for interested in X product."
For example, let's say you want to create two paths for your order placed automation, depending on the products in the order. If contacts have a certain item in their order, they should receive a special email. Contacts who didn't order the specified item can proceed down the other path that doesn't contain information about the specified product.
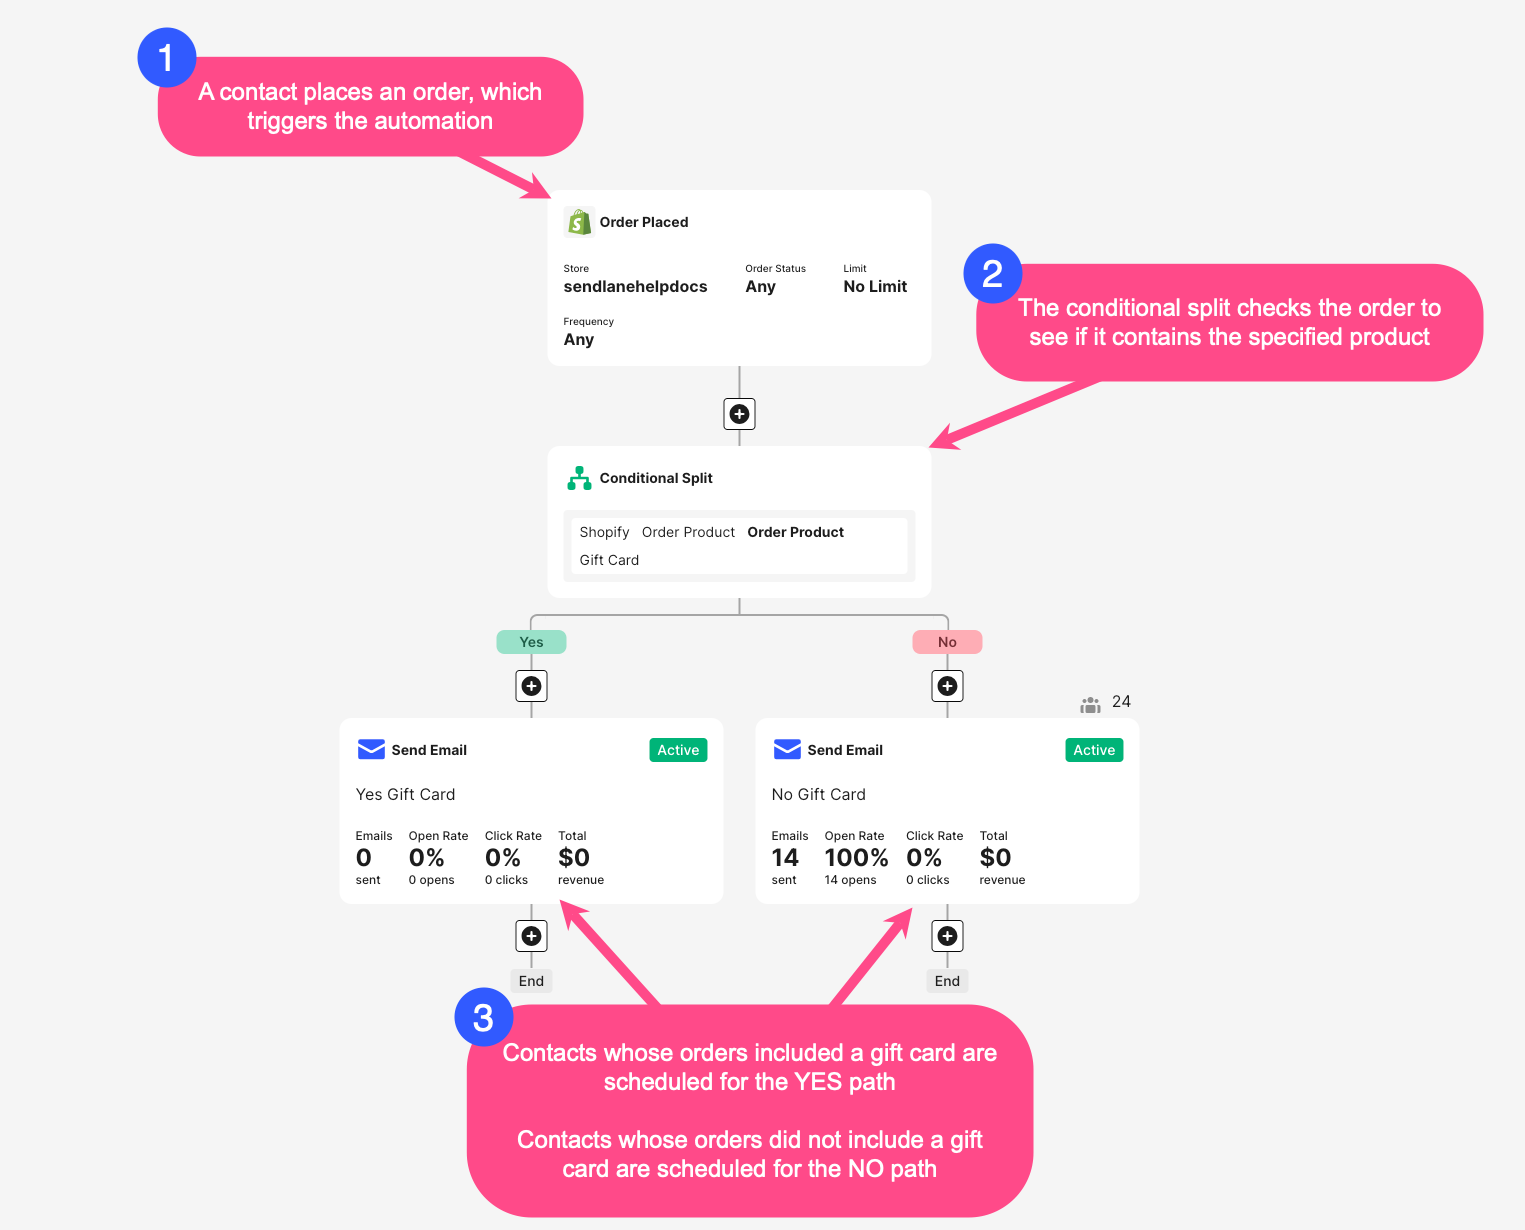
Let's say we want to create an order placed automation with two paths: one for contacts whose orders include a gift card and one for contacts whose orders do not. Here's how that automation works:
A contact places an order, which triggers an order placed automation
The first node in the automation is a conditional split, which checks to see if certain specified items are in the order
Contacts whose orders contain gift cards are scheduled to receive nodes on the YES side of the split, contacts whose orders don't contain gift cards are scheduled to receive nodes
When do conditional splits check for the specified conditions?
When a contact meets an automation trigger's criteria, each subsequent action is nearly instantly queued for the contact. If there are no wait nodes before a conditional split node, the conditional split checks the contact's conditions as soon as they trigger the automation.
This near instant check means that if a conditional split's logic includes opened or clicked conditions, the split will immediately check for those engagement metrics after messages are sent without enough time for contacts to engage. Depending on the overall logic of your automation, it often makes sense to add a 24-hour wait node before a conditional split node that uses engagement-based conditions.
A condition using an integration will only pull contacts who "exist" to the integration into the YES side of a conditional split
Using an integration based condition in a conditional split will only pull contacts who "exist" to the integration to the YES side of a conditional split. This means that if you're using a Shopify condition in your split, only contacts who have interacted with your store (by starting checkout if already tracked, creating an account, or placing an order) will be sent down the YES side of your split.
Let’s say you want to create a conditional split that divides your audience into contacts who have placed at least 1 order and contacts who have placed 0 orders.
Your condition should be set as Customer > Total Orders Placed > is greater than > 0:
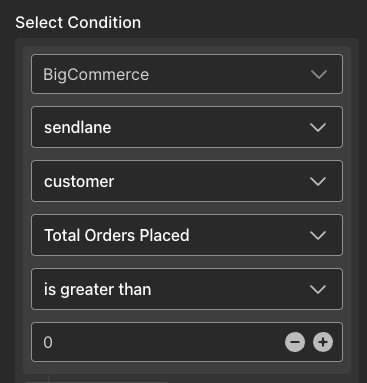
The YES side of this conditional split will grab contacts who Shopify recognizes and have placed at least 1 order. The NO side will grab contacts who do not yet "exist" to Shopify AND contacts who exist in your store’s database but have not yet placed an order.
Add a conditional split
To add a conditional split to your automation:
Click the + button
Click conditional split
Set your conditions
Click Save
The conditions you select will funnel contacts who meet them down the YES branch. Contacts who do not meet the conditions specified will be sent down the NO branch.
If you use an eCommerce integration like Shopify or BigCommerce to create conditional split conditions, contacts who trigger your automation and are not associated with your eCommerce store (in other words, haven't made an account or completed a purchase) will be sent down the NO branch.
Flip yes and no paths for a conditional split
You can flip the yes and no paths for a conditional split to move existing nodes from one branch to another.
Contacts who triggered the automation before you flipped the split will receive all actions they were originally scheduled to receive; contacts who triggered the automation after you flipped the split will be scheduled to receive the new paths.
To flip a conditional split's branches:
Click the conditional split node
On the right-hand side of the node, click the flip icon
Click Flip Conditional Split
Merge conditional split paths
You can reconnect conditional split branches below the original conditional split to funnel contacts into a shared branch.
For example, you might want to use a conditional split in your order placed automation to send special content to customers who purchased a certain item. Once contacts receive the specialized content, they can be funneled back into the main content with a conditional split merge.
Some conditional split branches cannot be merged
Allowable merges are identified by blue connection icons that appear when you click the connection icon under the node you want to merge. You can merge the node anywhere you see a blue connection icon.
Some nodes may not produce a blue connection icon. For example, a branch cannot be merged into one of its parent nodes because this creates infinite loops.
Logic actions are not available inside a merged split path
Once a conditional split has been merged, audience split, conditional split, and goal nodes cannot be added to the merged split's path.
To merge conditional split paths:
Under the node you want to connect to another branch, click the connection icon. All possible connections will then be highlighted blue.
Click the blue connection icon in the location you want to merge your conditional split

To disconnect merged branches:
Click the merged connection icon
Click Delete

Delete a conditional split
To delete a conditional split:
Click the conditional split
Click the trash can icon
Select a path or both paths to delete
Click Delete