How to verify a Shopify sending domain
Last updated: March 17, 2025
Overview
Verifying a domain means using a subdomain of your business' website to send marketing emails that are identified as coming directly from your brand, without qualifiers such as "via Sendlane" appearing in Contacts' inboxes. Read on to learn how to verify a sending domain and authenticate a sender profile!
Before getting started
Have admin access to your Shopify account. Sendlane cannot adjust your DNS settings.
Are you setting up a verified sending domain for the first time?
Read What is a Verified Sending Domain? before proceeding!
If you use Shopify's transactional emails, verify a separate subdomain with Sendlane
If you have verified a sending domain with Shopify Email, use a different subdomain when verifying with Sendlane. If the same subdomain is used for both, then both channels can be interrupted by one channel's deliverability hiccup, such as a temporary RBL flag.
Check out the video below to see the process from start to finish!
Step One: Confirm your domain is registered to Shopify
In order for the domain verification method described in this article to work, your domain must be registered to Shopify. To determine whether your domain is registered to Shopify:
Go to Whois.com
Enter your domain (company.com) in the smaller search bar at the top right of the corner where the search button is labeled “WHOIS"
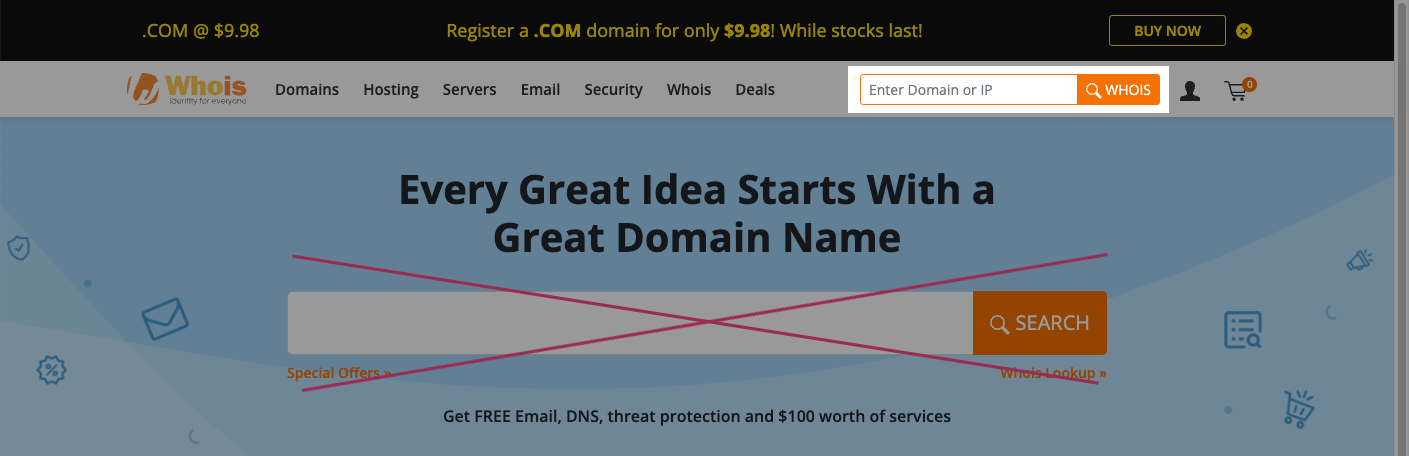
Click WHOIS
Scroll down to the Raw Whois Data section
Find the Reseller field
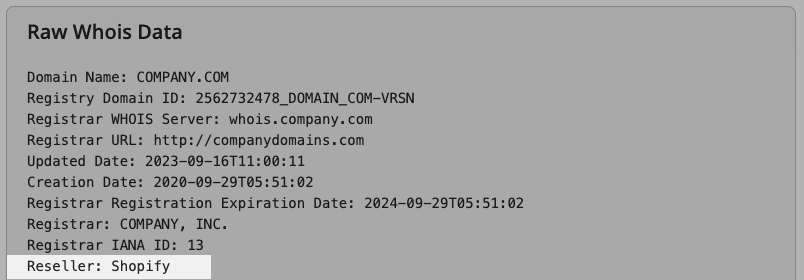
If the reseller is Shopify, your domain is registered to Shopify!
If the reseller is not Shopify, determine where your domain is hosted and follow the instructions in How to Verify a Sending Domain. Use your hosting provider’s documentation to guide you through adding the required DNS records to your DNS panel.
Step Two: Create a subdomain in Sendlane
Before starting the process of creating a subdomain, you'll need to decide what you want your subdomain to be and ensure it is not already being used.
Choose a common subdomain like send, mail, or e, or choose a word related to your business. Do not choose a subdomain that could cause inbox providers or Contacts to confuse you with another business. Using another business' name (including Sendlane) will cause deliverability issues.
Once you've selected a subdomain, check that it is not already in use by entering it into MxToolbox. The DNS Record Published test will return “DNS Record not found” if the subdomain is not already in use.

To create a subdomain in Sendlane:
Click the Account icon
Click Email
Click Setup Domain
Enter your business’ primary domain in the Domain Name field
Enter the word you’d like to use as your subdomain in the Sending Domain field
Click Save
Your subdomain has now been created!
Step Three: Add records to Shopify domain settings and verify
After creating your subdomain, you’ll see a list of CNAME, MX, and TXT DNS records appear on the Sending Domain slideout window. These records will authorize Sendlane to use your new subdomain to send Campaign and Automation emails from your account.
Add CNAME records to your Shopify domain
Log in to Sendlane
Click Account > Email > Settings icon to open the DNS records window for the subdomain you created in the steps above
Open another tab or window and log in to Shopify
Click Settings
Click Domains
Select your primary domain
Click the Domain settings dropdown*
Select Edit DNS settings
Click the Add custom record dropdown
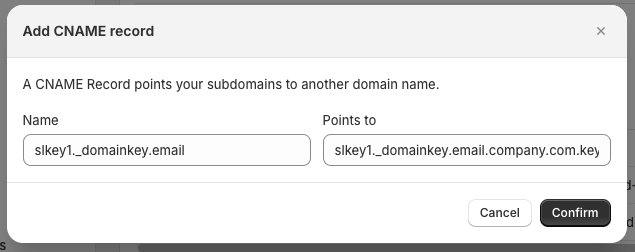
Select CNAME
Navigate to the DNS records window in Sendlane
Click the copy icon next to the CNAME record’s Host column
Navigate to your Shopify tab or window
Paste the CNAME Host copied from Sendlane into the Name field
Navigate to the DNS records window in Sendlane
Click the copy icon next to the CNAME record’s Value column
Navigate to your Shopify tab or window
Paste the CNAME Value copied from Sendlane into the Points to field
Click Confirm
Repeat steps 9-19 for the second CNAME record
*If you do not see the Domain settings dropdown, your domain is not hosted by Shopify. Determine your domain's hosting provider and follow the instructions in How to Verify a Sending Domain. Use your hosting provider’s documentation to guide you through adding the required DNS records to your DNS panel.
Add an MX record to your Shopify domain
Click the Add custom record dropdown
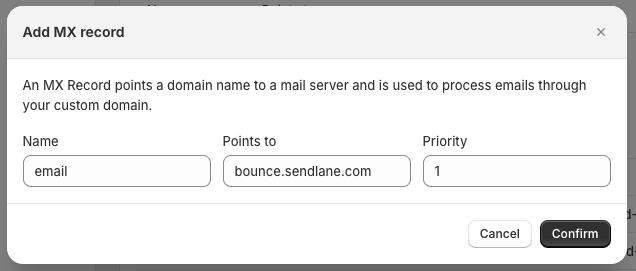
Select MX
Navigate to the DNS records window in Sendlane
Click the copy icon next to the MX record’s Host column
Navigate to your Shopify tab or window
Paste the MX record’s Host into the Name field
Navigate to the DNS records window in Sendlane
Click the copy icon next to the MX record’s Value column
Navigate to your Shopify tab or window
Paste the MX record’s Value into the Points to field
Enter
1in the Priority fieldClick Confirm
Add TXT records to your Shopify domain
Click the Add custom record dropdown
Select TXT
Navigate to the DNS records window in Sendlane
Click the copy icon next to the TXT record’s Host column
Navigate to your Shopify tab or window
Paste the TXT record’s Host into the Name field
Navigate to the DNS records window in Sendlane
Click the copy icon next to the TXT record’s Value column
Navigate to your Shopify tab or window
Paste the TXT record’s Value into the TXT Value field
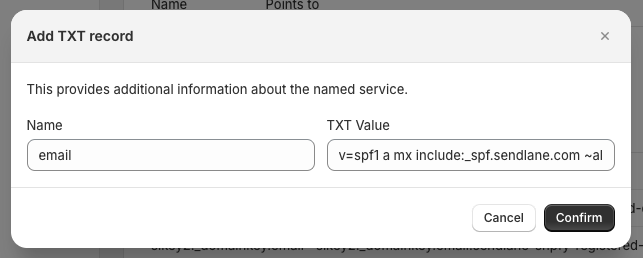
Click Confirm
Repeat steps 1-10 for the second TXT record
Step Four: Link a sender profile to your verified domain
After your subdomain has been verified, you need to create a new or edit an existing sender profile to use your verified subdomain to send from.
Create a new sender profile
Navigate to the sender profile tab by clicking Manage sender profiles on the Sending Domain slideout window or clicking the Audience icon > sender profile tab
Click + sender profile
Enter the Sender name and Company name
Under Domain, select the Verified radio button
Under From Email, enter a prefix for your new sender profile and select your verified subdomain from the dropdown
Enter a Reply to email address
Enter your business’ address in the address fields
Click Save
Edit an existing sender profile
Click the arrow icon in the View column next to the sender profile you want to edit
Click Edit
Under Domain, select the Verified radio button
Under From Email, enter a prefix for your sender profile and select your verified subdomain from the dropdown
Click Save
Step Five: Warm your verified domain
Both methods of domain verification result in a new or reset sending reputation. After you verify a sending domain for the first time, we strongly recommend following the guidance in How to warm your authenticated sending domain.
Troubleshooting
I don't see the option to select Edit DNS settings in Shopify!
If you do not see the domain settings dropdown and cannot select Edit DNS settings in Shopify, your domain is not hosted by Shopify. Determine your domain's hosting provider and follow the instructions in How to Verify a Sending Domain. Use your hosting provider’s documentation to guide you through adding the required DNS records to your DNS panel.