How to verify a sending domain
Last updated: May 29, 2025
Overview
Verifying a sending domain means using a subdomain of your business' website to send marketing emails identified as coming directly from your brand.
Check out What is a verified sending domain? before proceeding, then read this guide to learn how to verify a sending domain and authenticate a sender profile!
Before getting started
Have admin access to your website's DNS settings; Sendlane cannot adjust your DNS settings.
Shopify users should use the How to verify a Shopify domain guide
Step One: Prepare to update your DNS
There are two methods of verifying a sending domain: NS records only or a combination of CNAME, MX, and TXT records. Sendlane looks at your primary domain to determine which DNS records your domain needs.
What do I do if I see NS records in Sendlane, but my hosting provider doesn't allow me to add NS records?
If you see NS records on the sending domain slideout window, but your website's host doesn't allow you to add new NS records, contact your customer success manager or Sendlane support. We'll set you up with the DNS records you need!
AWS supports NS records, but users hosting AWS must also request CNAME/MX/TXT records.
If your DNS host is Wix or Hostgator, you need to move your DNS before proceeding
Wix and Hostgator do not support either verification method; you must move your DNS hosting to a different provider.
We highly recommend Cloudflare.
Step Two: Create a subdomain in Sendlane
You MUST ensure your intended subdomain is not already being used before proceeding
If you have previously used subdomains of your primary domain for sending (or any other reason), you should not reuse them with Sendlane. If you attempt to use a subdomain still in use, meaning its DNS records are associated with another ESP, you will receive errors when verifying it with Sendlane.
Even if you clear the DNS records associated with a subdomain previously used for email marketing, you will bring the sending reputation of that subdomain to Sendlane. We highly recommend creating a subdomain that has never been used before.
Before creating a subdomain, decide what you want it to be and ensure it is not already being used.
Choose a subdomain like send or e, or choose a word related to your business. Do not choose a subdomain that could cause inbox providers or contacts to confuse you with another business. Using another business' name (including sendlane) will cause deliverability issues.
Once you've selected a subdomain, check it is not already in use by entering it into MxToolbox. The DNS Record Published test will return DNS Record not found if the subdomain is not already used. If you receive any other result, remove all DNS records from your intended subdomain OR choose a different subdomain.

To create a subdomain in Sendlane:
Click the Account icon
Click Email
Click Setup Domain
Enter your business’ primary domain in the Domain Name field
Enter the word you’d like to use as your subdomain in the sending domain field
Click Save
Your subdomain has now been created!
Step Three: Add records to your DNS panel and verify
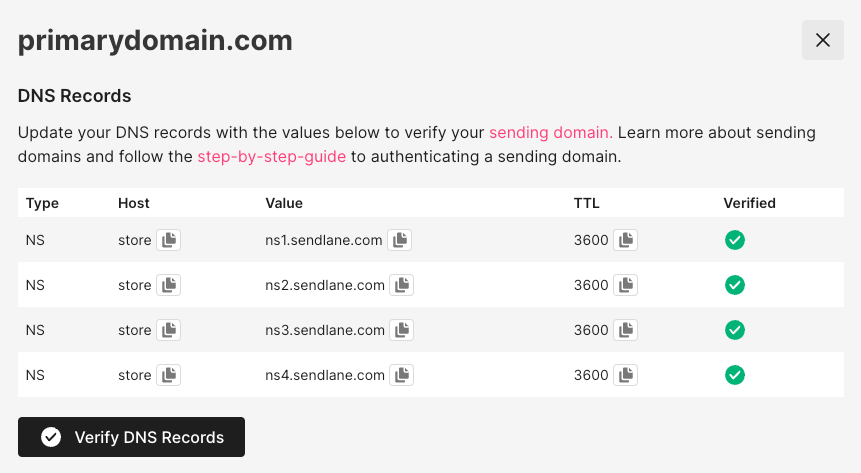
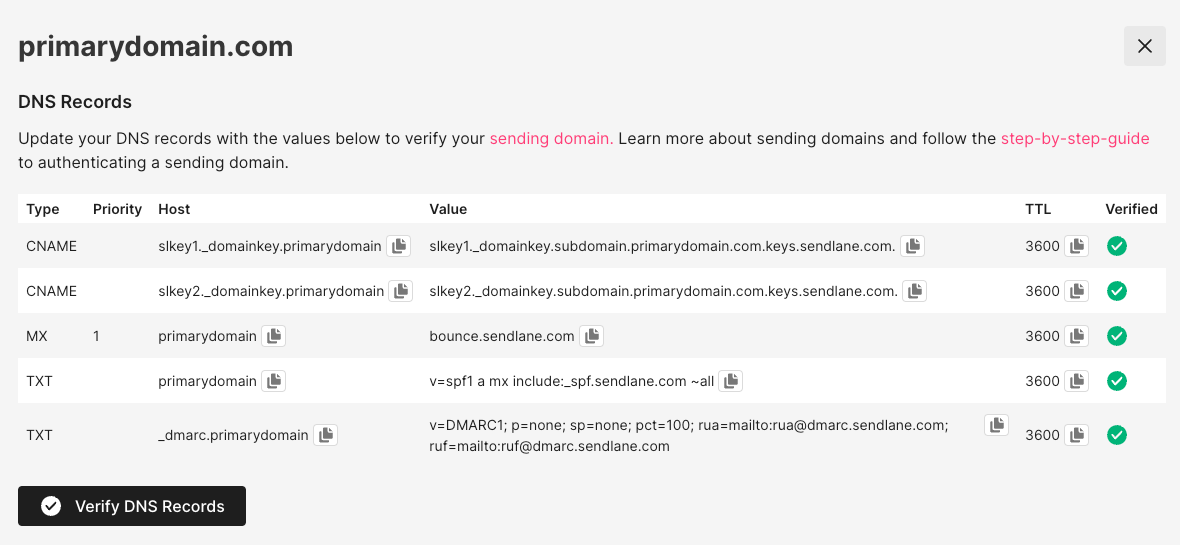
After creating your subdomain, you’ll see a list of DNS records appear on the sending domain slideout window. Some hosting providers require NS records, and others require MX/TXT/CNAME records.
You'll use this information to create records in your DNS panel that will authorize Sendlane to use your new subdomain to send campaign and automation emails from your account.
You'll create a new record for each line listed; for example, if your provider requires the NS records method, you'll create four new NS records in your DNS panel. If your provider requires MX/TXT/CNAME records, you'll create one MX record, two CNAME records, and two TXT records.
Adding DNS records varies by DNS provider but usually involves selecting a record type from a dropdown and entering the host, value, and TTL information you copied from the sending domain slideout in the specified fields. Watch the video below to see this process demonstrated in Cloudflare.
Use your DNS providers’ documentation to ensure you follow the correct procedure for adding new DNS records (do not edit any existing records). Below are links to documentation for popular DNS providers:
NS Method
|  |
CNAME/MX/TXT Method
|  |
You need to create new DNS records; do not alter existing DNS records
Look for language like “add” and “create,” which indicate new DNS records, versus “change,” “edit,” or “update,” which indicate modifying existing DNS records.
Once you’ve added the DNS records provided by Sendlane to your DNS panel, click Verify DNS Records. You should see a new Verified column with green checkmarks next to each record, indicating that the records were added correctly.

If the system can’t verify a record, you’ll see an X icon instead of a checkmark. Review the DNS records you created in your DNS panel against the DNS records in the sending domain slideout and make any necessary changes; click Verify DNS Records again. Verifying DNS records can sometimes take up to 24 hours.
Step Four: Link a sender profile to your verified domain
After your subdomain has been verified, you need to create a new or edit an existing sender profile to use your verified subdomain to send from.
Create a new sender profile
Navigate to the sender profile tab by clicking Manage sender profiles on the sending domain slideout window or clicking the Audience icon > sender profile tab
Click + Sender Profile
Enter the Sender name and Company name
Under Domain, select the Verified radio button
Under From Email, enter a prefix for your new sender profile and select your verified subdomain from the dropdown
Enter a Reply to email address
Enter your business’ address in the address fields
Click Save
Edit an existing sender profile
Click the arrow icon in the View column next to the sender profile you want to edit
Click Edit
Under Domain, select the Verified radio button
Under From Email, enter a prefix for your sender profile and select your verified subdomain from the dropdown
Click Save
Step Five: Warm your verified domain
See How to warm your authenticated domain for instructions on properly warming your new sending domain.
Additional Resources
A Deep Dive into Gmail’s 2024 Engaged Sending ChangesA Review Of Gmail’s 2024 Deliverability Changes: What You Need To Know
Yahoo - More Secure, Less Spam: Enforcing Email Standards for a Better Experience
Gmail - New Gmail protections for a safer, less spammy inbox
Troubleshooting
I added my DNS records, why are they not verified in Sendlane?
There are two common reasons your sending domain may not be verified in Sendlane after following the instructions above:
You added records to the account where you registered the domain, but you have actually moved DNS control to another DNS provider. Go to the current DNS provider for your domain and add them there.
The sending domain you added has other associated records. You may have attempted to verify a subdomain that is already in use. Try verifying another subdomain or remove any records associated with your subdomain that are not Sendlane's records. For example, if you chose
mail.domain.comas your sending domain,mail.domain.comcannot have NS, A, CNAME, TXT, or MX records currently existing in its DNS. If you do consider changing your sending domain from "mail" to "email" or "e" or something other than "mail" in the first step above
If you use separate services for your domain and hosting, please add these records to the service that controls DNS. You can check which service controls your DNS using a service like DNS Checker. Enter sendlane.com, and you’ll see we use Cloudflare for our DNS!
My sending domain says Lost Verification, what should I do?
Your sending domain may have lost verification due to a temporary interruption in communication between Sendlane and your website's DNS. In most cases, re-verifying clears lost verification issues.
To re-verify your records:
Click the settings icon next to your domain
Click Verify DNS Records
Your records may take up to an hour to re-verify. If you experience further issues, please contact Sendlane support or your customer success manager.
How can I see my sending domain Type, Host, Value, or TTL information?
This information can be retrieved by clicking the gear icon in the Actions column of the sending domains section.
Why is Google showing a warning on my email that was sent with an authenticated sending domain?
This warning usually appears on emails sent with an authenticated sending domain because the email was sent to the email address used in the sender profile. Emails sent to the same email address they're sent from can seem suspicious to Google's filters.
Try sending your email to a different email address to see if the warning still appears.
How can I add more than one NS record if I use Google Domains?
Check out Google's instructions under "Create or modify a resource record," then add the four NS records in a single row.
