Introduction to Shopify templating syntax
Last updated: February 28, 2025
Overview
You can use templating syntax to insert dynamic data from the payloads of events that trigger certain Shopify automations. Read on to learn about how to use templating syntax in Shopify automations.
Available data types in Shopify automations
Order and product data can be dynamically inserted into certain Shopify automation emails, depending on the automation's trigger.
When specified events occur, such as a website visitor clicking an "add to cart" button, a webhook sends a payload of related data to Sendlane. That data can be dynamically inserted into automation emails.
The data you can render in an automation email depends on the event that triggers the automation and that event's place in the buying cycle:
Action | Event sent to Sendlane contains | Automation triggered |
Customer clicks on a product page AND does not complete an order within the specified time | Product data | Abandoned product viewed |
Customer clicks "add to cart" | Product data | Added to cart |
Customer clicks "add to cart" AND does not complete an order within the specified time | Product data | Abandoned cart |
Customer clicks "start checkout" AND does not complete an order within the specified time | Checkout data | Abandoned checkout |
Customer completes an order | Order data | Order placed |
Standard Shopify data
The order, customer, and product data below are standard for Shopify stores. Your Shopify store may provide additional useful data not covered in this section; see Other Shopify data below for more information.
Product data
The following product data can be inserted into emails in automations using a Shopify Abandoned Product Viewed, Added to Cart, or Abandoned Cart.
To insert any of the following syntax into your email, paste the following assignment tag in a text element at the very top of your email: {% set product = trigger.getProduct() %}
Description | Templating syntax | Renders as | Notes |
Quantity of products in order |
| 1 | |
Product name/title |
| Shirt | |
Product variant name/title |
| Shirt - Blue | |
Product image URL |
| https://cdn.shopify.com/s/files/1/0607/1844/8811/files/3DrawerCart_0290b7-963-4b2e-bfa2-a67c2838f2b1.jpg?v=17120267&width=800 | Syntax renders as a raw URL. You can insert it anywhere you can insert a URL, like a hyperlink, button, or image. |
Link to product’s page |
| https://store.com/collections/best-sellers?handle=essentials-half-zip | Syntax renders as a raw URL. You can insert it anywhere you can insert a URL, like a hyperlink, button, or image. |
Checkout data
The following customer data can be inserted into emails in automations using a Shopify Abandoned Checkout trigger.
To insert any of the following syntax into your email, paste the following assignment tag in a text element at the very top of your email: {% set checkout = trigger.getCheckout() %}
Description | Templating syntax | Renders as | Notes |
Checkout URL |
| https://store.myshopify.com/85861892391/checkouts/ac/Z2NwLXVzLWNlbnRyYWwxOjAxSFMyN05LVzI4TUVHRFdHODFNMVMxMFFT/recover?key=d6098c2cbc45d515a7c0b5d681c66e77 | |
Order data
The following order data can be inserted into emails in automations using a Shopify Order Placed trigger.
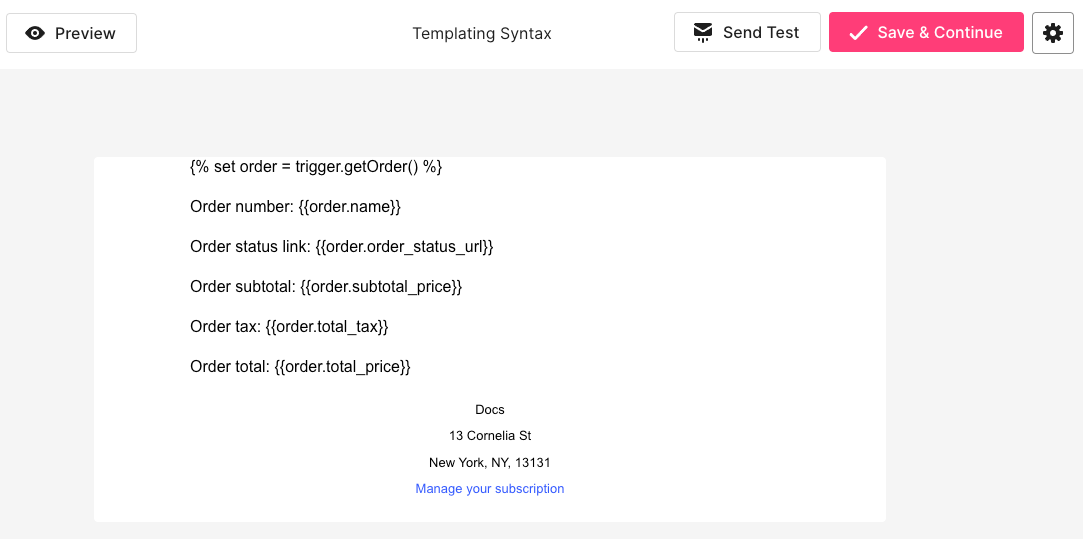
Paste the following assignment tag in a text element at the very top of your email: {% set order = trigger.getOrder() %}
Description | Templating syntax | Renders as | Notes |
Order number |
| #1003 | |
Order status URL |
| ||
Order subtotal |
| 10 | |
Order tax |
| 2 | |
Order total |
| 12 | |
Billing address first and last name |
| Jimmy Kim | Add the title filter to capitalize each name for contacts with middle or other additional names: |
Billing address line one |
| 13 Cornelia St | |
Billing address line two |
| Apt 13 | |
Billing address city |
| New York | |
Billing address state or province |
| NY | |
Billing address ZIP code |
| 13131 | |
Billing address country |
| USA | |
Shipping address first and last name |
| Jimmy Kim | Add the title filter to capitalize each name for contacts with middle or other additional names: |
Shipping address line one |
| 13 Cornelia St | |
Shipping address line two |
| Apt 13 | |
Shipping address city |
| New York | |
Shipping address state or province |
| NY | |
Shipping address ZIP code |
| 13131 | |
Shipping address country |
| USA |
Formatting and rendering templating syntax
Prepare your email for templating syntax with an assignment tag
The assignment tag tells the email builder to look out for templating syntax that needs to be rendered into plain language. Without the assignment tag, your templating syntax will not render and will appear to contacts as raw templating syntax.
Insert the appropriate assignment tag according to the table above in a text element at the very top of your email. The assignment tag will not be visible in email previews, test emails, or live emails.
All other elements in your email must be below the text element containing the assignment tag.
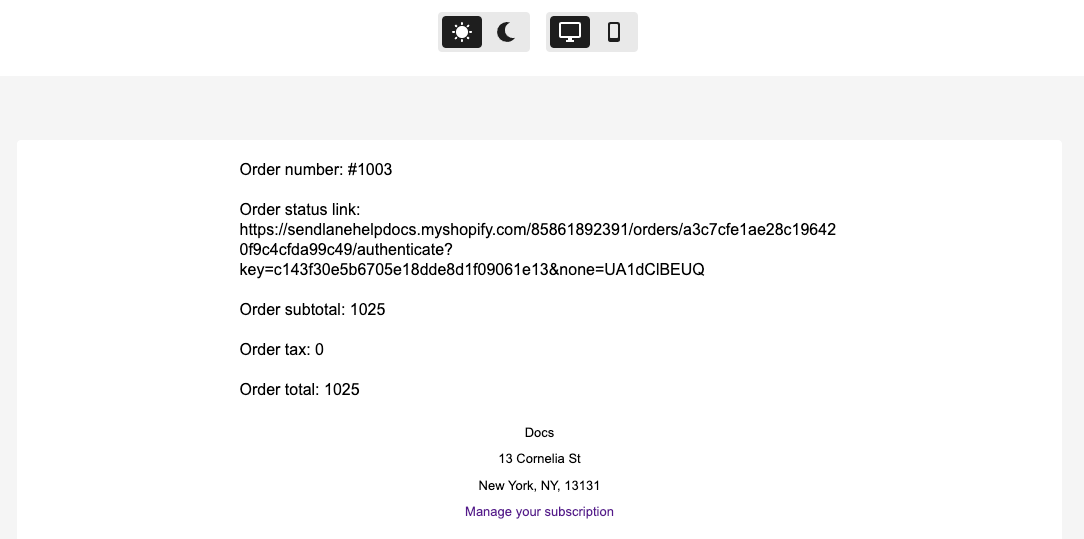
The screenshots below show a draft email with an assignment tag correctly set, templating syntax that renders basic information about an order, and the results of previewing the draft:
Create loops to display all products in an order
If you use product related templating syntax without a loop, only the first product from the order or checkout will be rendered in the email.
To add a loop function:
Copy the following loop tag
{% for product in order.line_items %}
Paste the loop tag directly above the beginning of your product related syntax
Copy the following end loop tag
{% endfor %}
Paste the end loop tag directly below the end of your product related syntax
For example, the syntax below will display a list containing the name of each product in the randomly selected order or checkout used by the email builder preview:
Order
{% for product in order.line_items %}
{{product.title}}
{% endfor %}
Checkout
{% for product in checkout.line_items %}
{{product.title}}
{% endfor %}
Provide context for all templating syntax in your email
Templating syntax returns raw data without contextual labels
For example, the order number tag {{order.name}} returns a raw order number without indication that it is an order number.
If you do not include text that provides context for your templating syntax, your email will be difficult to understand.
The table below shows the results of templating syntax with and without manually added contextual labels:
Content | Renders as |
| #1032 |
Order number: | Order number: #1032 |
Other Shopify data
The examples and references above represent the most commonly available and valuable data that can be dynamically pulled into emails using templating syntax. However, Shopify may provide more useful data that you can take advantage of!
Advanced users can use the json_encode function to look at all data available with a given automation trigger.
To see available data:
Open an automation
Select an order or checkout related trigger
Add an email node
Set the email node’s name and subject line to anything you like
Click Edit Email
Click Start From Scratch
Add a text box to your email
Copy the following snippet depending on whether your trigger is order or checkout based:
Checkout:
{{ trigger.checkout | json_encode }}
Order:
{{ trigger.order | json_encode }}
Paste the snippet into the text box
Click Preview
In the email preview, you’ll see a large block of JSON that is difficult to read. Copy the entire block, then paste it into a JSON parser, like jsonformatter.org, to see your data in a structured format:
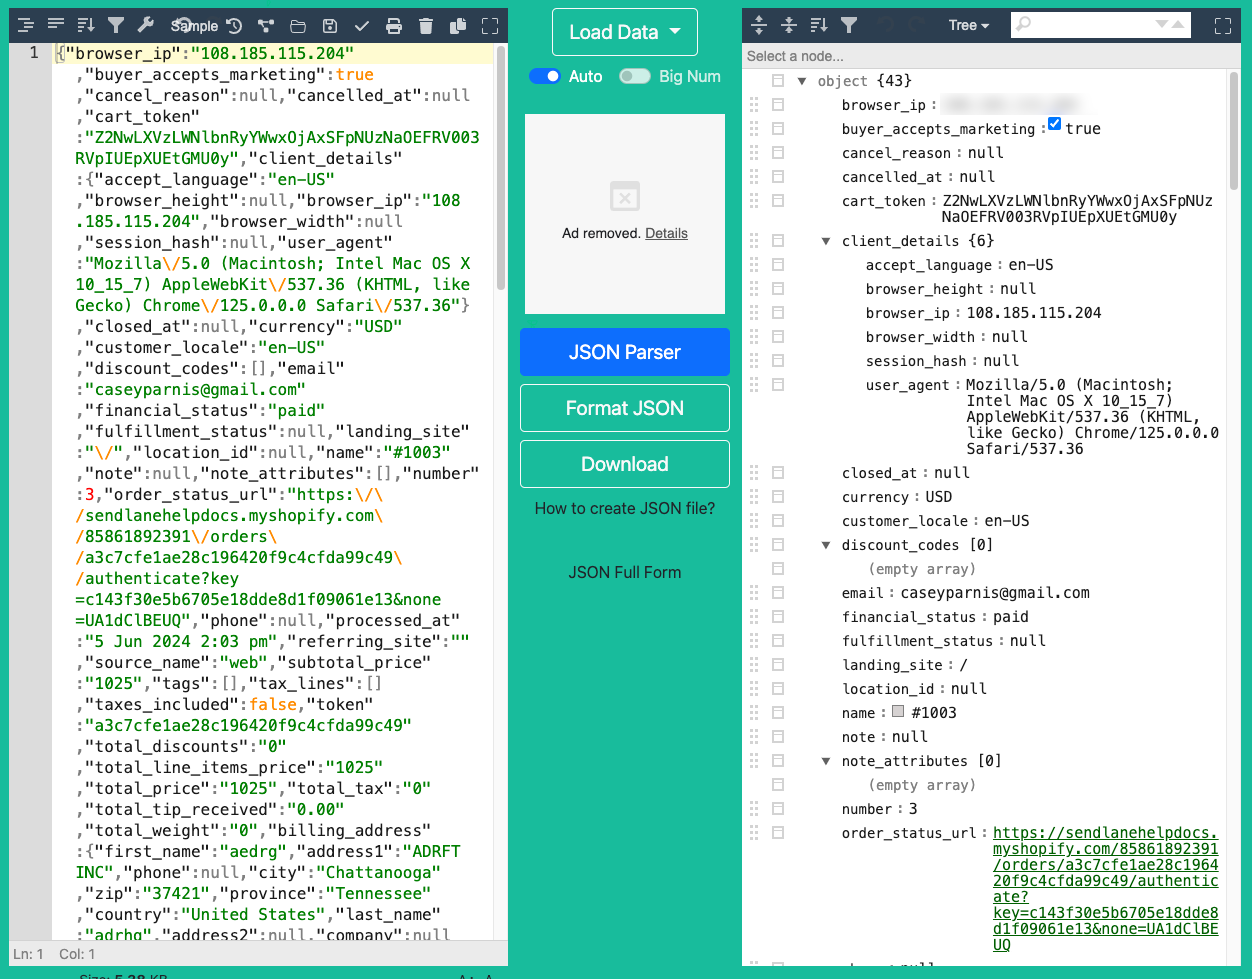
You can now select items to render in your automation emails from the parsed JSON. For example, let's grab that order_status_url towards the bottom of the parsed JSON above.
An order status URL would only be appropriate in an order placed automation, so we'll use the {% set order = trigger.getOrder() %} assignment tag in a text element at the very top of the email.
If we paste order_status_url into our email at this point, nothing will happen even though we have the correct assignment tag set. We need to format the syntax properly first.
Now, we need to show the assignment tag where to look for syntax that needs to be rendered. Since we're using the order assignment tag, we'll add the word order and a period before order_status_url to get order.order_status_url, and finish with a space plus two curly brackets surrounding the syntax: {{ order.order_status_url }}