How to Integrate Miva and Sendlane
Miva is an eCommerce platform you can use to build your online store with a shopping cart and checkout process.
Integrating Sendlane and Miva allows you to automatically sync customers to Sendlane so you can stay in touch via targeted email campaigns and automation funnels!
In this article we'll cover:
- What Version of the Sendlane Miva Module Am I Using?
- Keeping Your Sendlane Module Up to Date in Miva
- Uninstalling/Disconnecting an Old Miva Integration
- Miva Account Information
- Adding Miva's Sendlane Module
- Configuring Sendlane's Miva Integration
Plus, we'll also cover some helpful next steps and ways to troubleshoot if you have any trouble during the process!
Download the Sendlane for Miva Module
To see what version of the Sendlane module you have installed in your Miva account, navigate to Settings → Modules then find Sendlane in the list by scrolling down the page or searching for Sendlane
Access the latest version of the Sendlane for Miva module file from the Miva app store by clicking Download Module

The Sendlane for Miva module will be added to your Miva app store cart. Click Secure Checkout to continue the Customer Information page.
The Customer Information page will open with a form asking for your billing email address, name, and other contact information. Fill the form out and click Secure Checkout to continue to the Order Complete page.
Download the .zip file containing the Sendlane for Miva module by clicking Download File Now on the Order Complete page. Save the file to your desktop or another easily accessible folder on your computer.

Open the .zip file to extract the sendlane.mvc file ( Windows|macOS)
Install the Sendlane for Miva Module
Log in to your Miva account and navigate to Settings → Domain Settings → Modules tab, then search for or scroll down to click on Sendlane, then:
- Click the Files tab
- Click the Upload button
- Click Choose File and select the sendlane.mvc file you downloaded earlier
- Make sure the Overwrite checkbox is checked to overwrite your outdated module
- Click Upload to upload the new module file
- Click the Update button to complete the process

This process should replace your outdated Sendlane module and install the new, up to date version. If you experience any errors or other issues during this process you’ll need to remove the outdated Sendlane module from your Miva account manually, then install the updated module file. Follow the steps outlined below in the Uninstalling/Disconnecting an Old Miva Integration and Adding Miva’s Sendlane Module sections to update your module manually!
Install an Email Marketing Opt-In Checkbox
Head to Settings > System Extension Settings and ensure the Send accepts marketing checkbox is checked

Once the checkbox is checked, navigate to your Miva store's OCST file via User Interface > Templates > OCST
Add the following snippet anywhere you'd like the checkbox to display before the </body> tag
<div id="update-record"> <input type="checkbox" name="sendlane_accepts_marketing" value="Yes" checked /> Accept Marketing Emails </div>

Uninstall/Disconnect an Old Miva Integration
If you had a previous version of Miva connected to Sendlane, you'll want to wipe the slate clean by uninstalling the old module entirely and removing all of the old settings that were in place. If this is your first time integrating Miva and Sendlane, you can skip ahead to the Miva Account Information section!
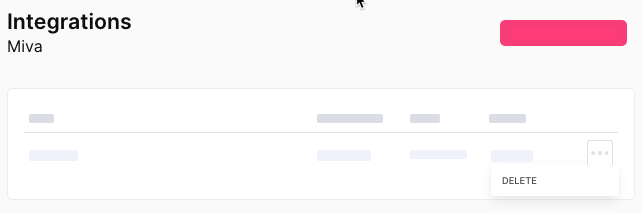
Start by deleting the previous integration inside of Sendlane by clicking Integrations → Miva → Dot Menu → Delete:
Next, log in to your Miva account to uninstall the previous module:
- Click on Settings → Modules then find Sendlane in the list
- Click the Dot Menu → Uninstall (Check out the Troubleshooting section below if you run into an error that references Scheduled Tasks at this point!)

- Settings → User Management → Groups → Click the checkbox next to Sendlane
- Click the Dot Menu → Delete Record(s) → red Delete button in pop-up window


Finally, delete the old API Token:
- Click the API Tokens tab and select Sendlane
- Click the Dot Menu → Delete Record(s) → red Delete button in pop-up window


Miva Account Information
To connect Miva to your Sendlane account you'll need to download the Miva + Sendlane module file and save it to an easily accessible folder on your computer.
Be sure the module file is saved as sendlane.mvc and do not change the filename. Other filenames will cause installation failure!
You'll also need to have the following information from your Miva account accessible: Miva Store Code, Miva Store URL, Access Token & Signature, and API Key (you have to install Miva’s Sendlane module before you can access your API Key, see the Adding Miva’s Sendlane Module below for instructions!).
Each of these components can be found in your Miva Settings menu. Check out the detailed instructions below on how to find each component.
Miva Store Code:
Store Settings → Store Details tab → Identification section → Store Code field

Miva Store URL:
Domain Settings → Domain Details tab → Site Configuration section → Secure Base URL for Graphics field

Access Token & Signature:
User Management → Users page → Groups tab → Add Group

Fill in the Name field (we used Sendlane) and Description field (we used API Token) and click Save
Select your new Group from the list and click Privileges

Toggle on privileges for View in every row and click Close. Then, re-open the Privileges window to ensure all privileges have been successfully checked (sometimes all privileges do not successfully load on the first attempt, better safe than sorry!)

Uncheck the Group you created then click on the API Tokens tab → Add API Token button

- Enter a Name for the token (we used Sendlane) and set the Allowed IP Address field to 0.0.0.0/0
- Make sure Signature and Timestamp are both set to Required
- Make a note of your Access Token and click Generate to generate a Signature (every time you leave this pop-up window you’ll need to generate a new signature, so make sure to copy the one you generated!)
- Click Save

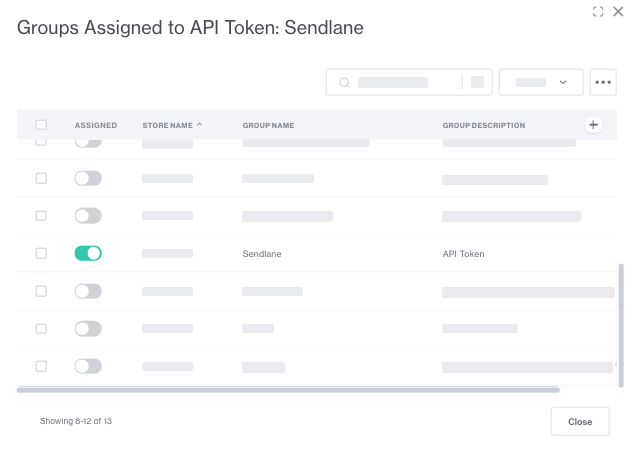
On the API Tokens page, select the Token you just created → Dot Menu → Groups

Toggle Assigned on for the Group you created earlier, then click Close
Adding Miva’s Sendlane Module
Navigate to Settings → Domain Settings → Modules

Click Add Module

Click Upload to find and choose the Sendlane for Miva module file you downloaded and saved to your computer (sendlane.mvc), then click Upload in the Upload File window.

Click Add to add the module file to your Miva account

Finish installing the Sendlane module by going to Settings → Modules

Search for “Sendlane” or scroll down to the Sendlane module, then confirm that you have the correct filename, version, and provider before moving on. [Filename: sendlane.mvc | Version: 2.0025 | Provider: www.emediasales.com].
If everything looks correct, click Install.

When you click Install you should be automatically taken to the System Extension Settings page. Grab your API Key from this page.
To reach this page again go to Settings → System Extensions

Then click the More dropdown menu and select Sendlane.

And copy your API Key!

Configuring Sendlane’s Miva Integration
Log in to your Sendlane account and click Integrations → Miva → Configure. This will open the New Miva Integration window.

- Enter your Miva Store Code, Miva Store URL, API Key, Access Token and Signature. Check out the Miva Account Information and Adding Miva’s Sendlane Module sections of this article for detailed instructions on how to locate this information in Miva!
- Select the List you'd like your Miva customers to be added to
- Choose to sync your customers' shipping addresses or billing addresses
- Click Continue
You'll see the integration status as Initializing at first, then Syncing as the data starts to transfer - this process is not instantaneous. Once the status updates to Installed you're all set!
Your Miva integration setup is now complete!
Miva customer data from the last 90 days will now be available in Sendlane, and any new leads or customers will be automatically synced over as well. Now you can develop targeted Campaigns and Automations for your Miva audience!
Next Steps
Now that your store is connected with Sendlane, you can create segments and automations to target your Miva customers more effectively!
Troubleshooting & Additional Miva Resources
I do not see my Miva customers within Sendlane
If you completed the integration process very recently the information sync will take some time. If you visit the Miva integration page within your Sendlane account and see that the status still shows Initializing or Syncing, some information or actions may not be available yet. Generally, this process should take no longer than an hour unless your contact List is long or you have a large number of products. Please get in touch with our support team if your integration page is stuck on Initializing or Syncing for an inordinate amount of time!
I'm getting an error that says "Error connecting integration"
You may see this error if there is no customer or order data in your Miva store. Once there is data in your Miva store that can be synced to Sendlane, you will be able to complete the integration.
I'm getting an error that says "Module 'Sendlane' is in use by one or more scheduled tasks"
Delete all scheduled tasks associated with the Sendlane module by going to Settings → Store Settings → Scheduled Tasks
If you are not able to delete scheduled tasks, make sure that your Sendlane module is active by navigating to Domain Settings → Modules → Sendlane → Active checkbox. If your Sendlane module is active and you still cannot delete scheduled tasks, please get in touch with our support team!

The new Sendlane module file is not overwriting the outdated Sendlane module
Follow the steps outlined in the Uninstalling/Disconnecting an Old Miva Integration and Adding Miva’s Sendlane Module sections to update your module manually!
If you have any other issues connecting your Sendlane and Miva accounts, our support team is available 24/7. Plus, the Miva team is just a few clicks away!
- Visit the Miva Support Suite
- Visit the Miva Documentation Site
Sign up for a Miva Account | Miva Blog